
Important Notes for Windows Users
Ensuring smooth execution, preventing execution locks, and managing antivirus false positives on Windows.
XyPriss is a hybrid web framework that pairs the developer productivity of TypeScript with high-performance native compiled engines (written in Go and C). To deliver this speed and cryptographic security, XyPriss includes pre-compiled native binaries.
1. Antivirus False Positives on Windows
For internal integrity, tampering defense, and runtime protection, some of our native engine binaries are compiled with code hardening and obfuscation. As a result, generic heuristic scanners—such as Windows Defender or third-party antivirus suites—may occasionally flag newly downloaded engine binaries as unrecognized or suspicious.
- Safe & Verified: Official XyPriss and XFPM binaries are clean, safe, and contain zero malware or telemetry backdoors.
- Strict Local Privacy: XyPriss and NEHONIX never collect, track, or transship any personal data. Everything runs strictly on your local machine.
- Direct Enterprise Support: For security audits or enterprise verification, reach our engineers directly at support@team.nehonix.com.
2. Recommended Configuration on Windows
To develop seamlessly with XyPriss on Windows without files being quarantined or execution blocked, you have two options:
Temporarily Disable Real-Time Protection
Ideal for fast bootstrap. Temporarily toggle Real-time protection off while running xfpm install and your development server (xfpm dev / xfpm run).
Add a Persistent Folder Exclusion
Recommended for ongoing development. Adds persistent exclusions for %USERPROFILE%\.xfpm and your workspace project directory.
Option A: Temporarily Disabling Real-Time Protection
Follow the step-by-step walkthrough below to disable Real-time protection in Windows Defender.
Step 1: Open Windows Security
Open Windows Security using either of the following methods:
- Press Win + I to open Settings → navigate to Privacy & security → Windows Security → click Open Windows Security.
- Or open the Start menu, type Windows Security, and press Enter.
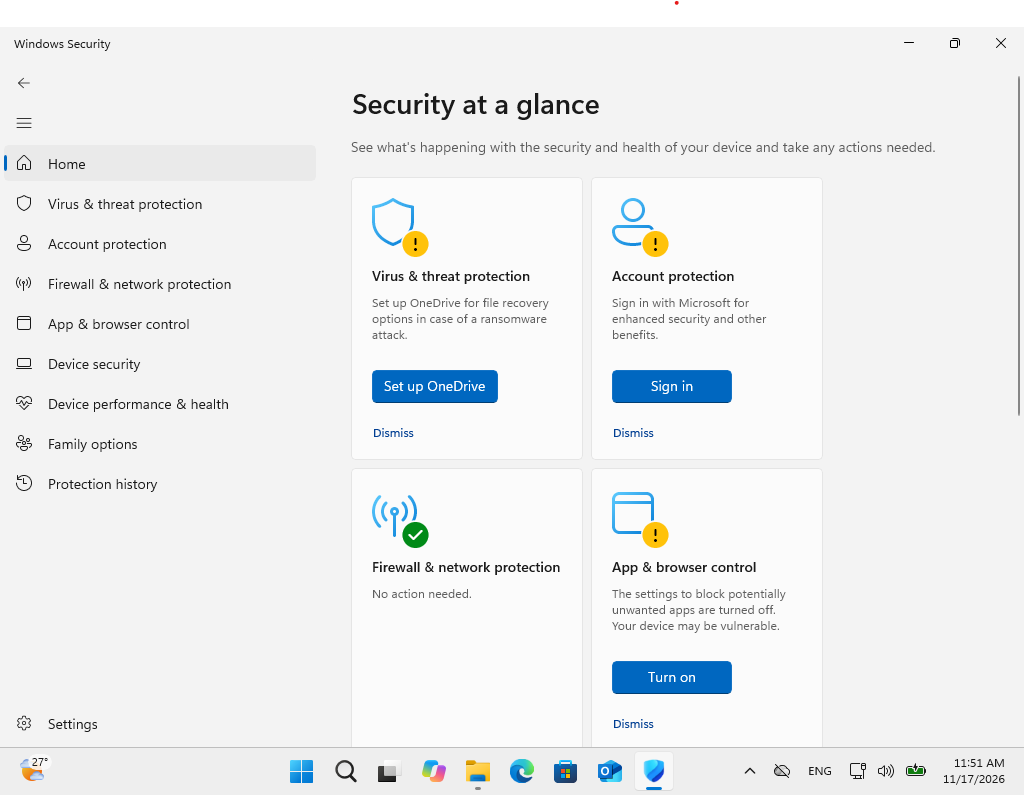
Step 2: Navigate to Virus & Threat Protection Settings
- In the left navigation menu or the dashboard cards, click on Virus & threat protection.
- Scroll down to the Virus & threat protection settings section.
- Click on the Manage settings hyperlink.
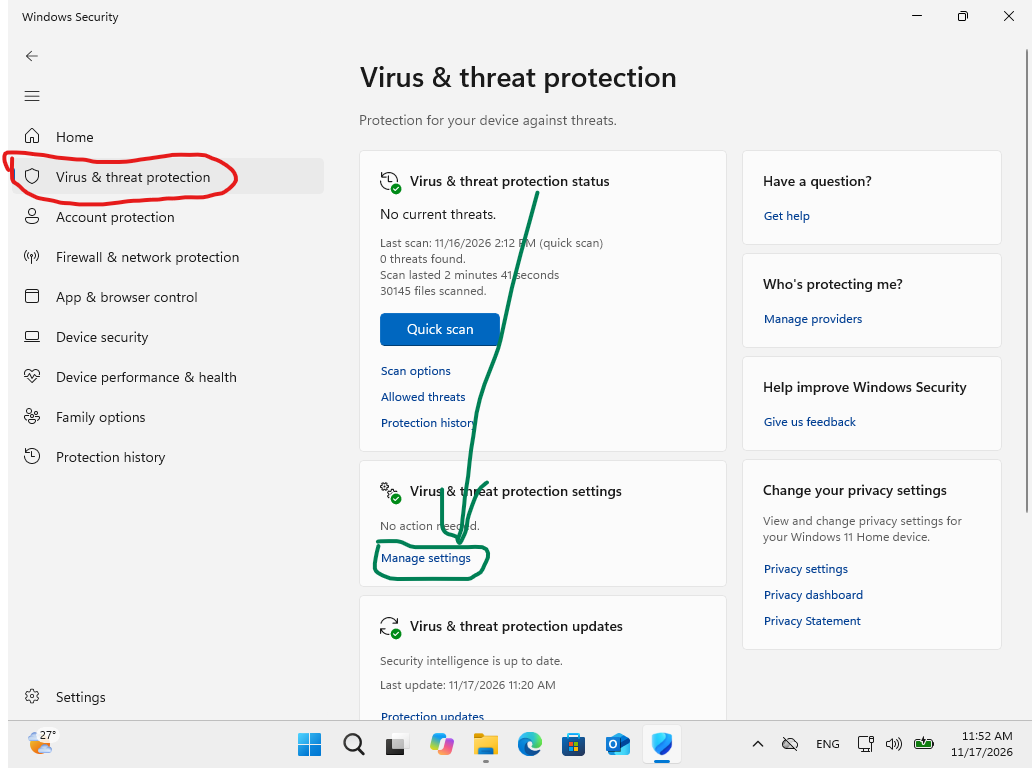
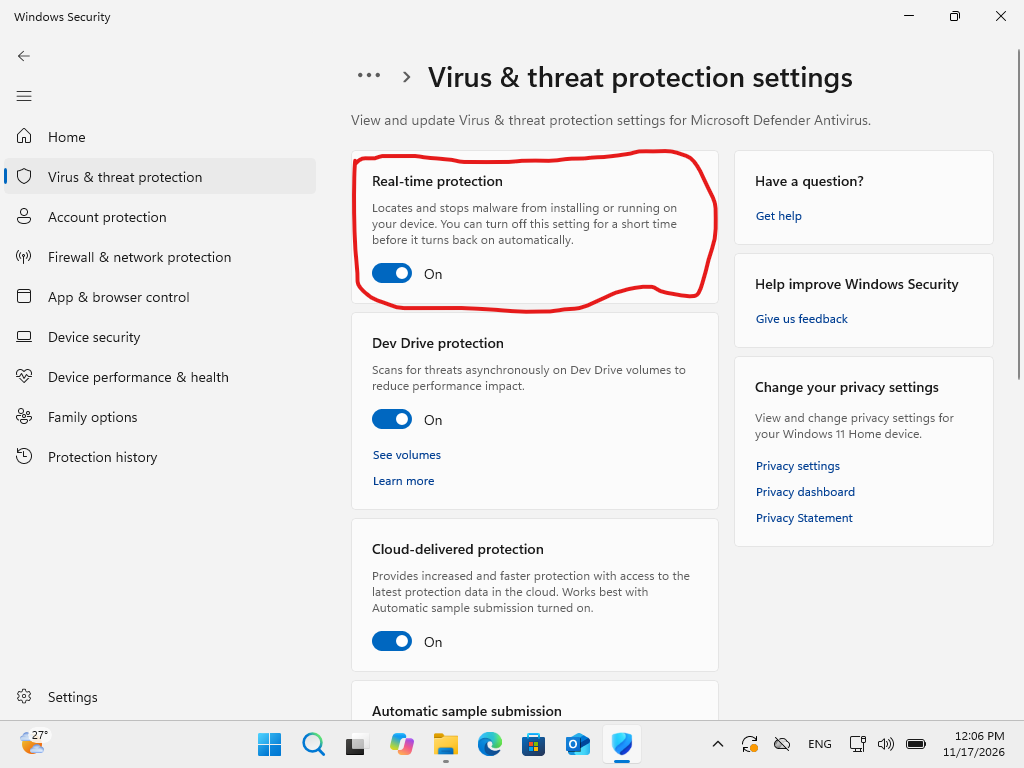
Step 3: Turn Off Real-Time Protection
- Locate the Real-time protection toggle switch at the top.
- Click the toggle to switch it from On to Off.
- When the Windows User Account Control (UAC) prompt appears asking "Do you want to allow this app to make changes to your device?", select Yes.
Option B: Adding a Persistent Folder Exclusion
If you prefer to keep Real-time protection enabled for the rest of your system, add persistent exclusions for the XyPriss package manager directory and your workspace projects.
Via Windows Security GUI
- In the Virus & threat protection settings page (from Step 2 above), scroll down to the Exclusions section.
- Click on Add or remove exclusions.
- Click Add an exclusion → select Folder.
- Add the following paths:
%USERPROFILE%\.xfpm(e.g.,C:\Users\<YourUser>\.xfpm)- Your project workspace directory (e.g.,
C:\Users\<YourUser>\Documents\projects\my-xypriss-app)
Via PowerShell (Run as Administrator)
Open an administrative PowerShell prompt and execute:
# Add global XFPM directory to Windows Defender exclusions
Add-MpPreference -ExclusionPath "$HOME\.xfpm"

# Add your project workspace directory (replace with your actual project path)
Add-MpPreference -ExclusionPath "C:\Path\To\Your\XyPriss\Projects"
3. Third-Party Antivirus Suites
If you are using third-party endpoint protection suites (such as Avast, AVG, Bitdefender, Kaspersky, or Norton):
- Open your antivirus management console.
- Locate the Protection Shields / Real-Time Scan settings.
- Either temporarily pause the active shield while developing, or navigate to Exceptions / Whitelist and add:
- The
%USERPROFILE%\.xfpmdirectory - Your project repository root folder
- The
4. Need Assistance?
If you encounter unexpected permission denials or binary lock errors on Windows, consult our Troubleshooting Guide or contact our security engineering team directly at support@team.nehonix.com.
Review global prerequisites, package manager installation, and initial project scaffolding.